Several factors affect tile layout. My suggestion is before installing the tile permanently, do a dry run. Lay out the tiles, dry(using no mortar) to see what works best for you. In large areas I usually use a focal point as my center, but if the focal point method causes me to have a small perimeter tile, I make adjustments. The focal point in the sun-room is the fireplace, so I used it as my center line originally. Here are some helpful drawings created from information in Craftsman’s Construction Installation Encyclopedia.
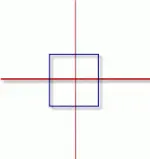
In these drawings, the red lines represent your chalk lines showing the midpoints running the length and width of the room. In my example of using the fireplace as the focal point of the room, I measured from the fireplace to the outside perimeter or wall in most cases, this measurement was 8 feet. My midway point was 4 feet and I made a chalk mark using my string line to show this on the floor. I then measured the width of the fireplace and it was 10 feet in width. I then ran a string line from my midpoint 5 feet from the edge of the fireplace to the outside perimeter of the room.
Where the two chalk lines intersect is the midpoint of your layout. The brick on the fireplace extended two feet into the room, so I needed to start laying out the tile, dry fitting to see if using this midpoint left me with a small tile on the edges of the rooms. Unfortunately it did. Using 18″ tiles and reference point “A” on the midpoint(where the chalk lines intersect), I was left with a 3 inch tile width on the outside of the room, less than 1/2 the width of my 18″ inch tile. I then placed the tile reference point “B” on the midpoint and was left with 12″ outside tiles along the width of the room and 10″ tiles along the outside length of the room. This was the best looking pattern as it avoided the tiny tile syndrome you see in many DIY tile installations, where the last row of tiles is less than 50% of the size of the uncut tiles.
When dry-fitting the tiles, I do use spacers to allow space for my grout lines. Doing these pre-install dry runs may be time consuming, but it is time well invested and it’s better to actually see the tile in place so that any adjustments can be made before installation. The initial dry run revealed my problem with the small tiles in areas away from the focal point method I was using. The compromise was using the reference point “B” on the midpoint. Even in the focal point area, I retained nearly full tiles on these edges and frankly a small width tile next to entry ways is best avoided. When we refer to odd and even,, we are referring to the number of tiles it takes to fill the length or width. 19 tiles across length and 9 across the width would be odd and odd.
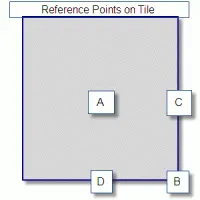
Use these reference points on your tile
If Width only is odd place Tile reference point D on the centerline
If your length is odd, start with tile point C on your center line
If length and width are both odd, place reference point B on layout center line
If length and width are even, use this layout with point A on your layout center line
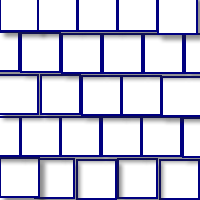
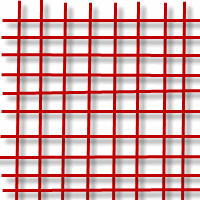
Running Bond or Subway Tile Pattern
In-Line or Jack-on-Jack Tile Layout
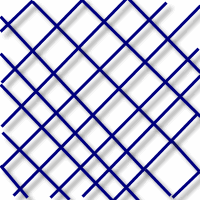
45 Degree Tile Installation
Laying Out Tile Using Running Bond or Jack-On-Jack, Square or 45 Degree Angle
If I have not lost you by now, you must be about to tackle a tile job. Here is where a dry run before installation can answer more questions than any article could, lay out the tiles using various patterns and see what looks best. I love the look of a 45 degree installation, but it takes more time to install. I used a Jack-On-Jack Layout. This layout is quick and besides I can take my Bosch GTL3 Wall and Floor Covering Laser and use the laser lines to keep my tiles straight and square. In the image gallery above are some of the patterns you can use. (excuse the Captain Crayon drawings of the Layout Patterns, but hey there will be no copyright infringement issues)
Armstrong-Clark’s deck and siding wood stain has nondrying conditioning oils that separate from the drying side of the formula. These oils penetrate deep into the deck or siding wood fiber where the wood’s natural oils used to be. This process rejuvenates the wood. The drying oils stay at the surface, lock in the conditioning oils […]